Saturday, September 26, 2009

Surface Refinement

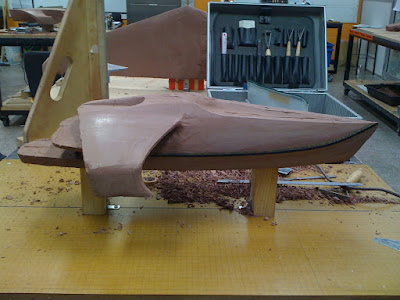
A few shots showing the new surface treatment. The upper surface of the side has remained the same, while the lower portion to the waterline has been given a subtle convex cross section. It has given the yacht a more aggressive stance and helped define the extended bow point.



Wednesday, September 23, 2009

Sketch-Overs


Scanner feeling better... somewhat.

Set one above, with more to follow...


Sketch-Over session = Updated Design Direction

After doing several pages of sketches over photos of the clay thus far, it was decided that I will change the surface forms. This includes changes to the hull lines and and extending the uppermost section to envelope the cabin.


Its a little hard to see here because the clay blends into itself, but the top lines extending from the bow point pull upwards and continue over and past the bridge, surrounding it in both sides. I will extend these lines past the bridge then possibly run them out/blend them in to the canopy surface.

Thursday, September 10, 2009

Matching Surface Symmetry

These pictures show how I have removed clay down to the points (depth) marked previously. I found that doing it this way (by not removing all the clay at once) would allow me to confirm that the points I had teken were correct and that I was not removing material that shouldn't be.


Trimming down to the Points


This technique seems to have worked for me as the symmetry across the centreline matches...


Transferring Points and Creating Symmetry

Lines were scored on the smoothed side of the model to create points that I could transfer to the unmodelled side. By using tables squares and rulers I was able to take measurements from the centre line to surface, and also the height above the base of the armature.


Where material needed to be removed on the right of the centreline, I scored a line down to that point, which gave me the depth of material that required removing.


Refining Major Surfaces

In these photos you can see that I have blocked in and smoothed the major surfaces from which I will reference all others from. The primary surface is the one that rises directly from the waterline (the darker surface), with the secondary being the vertical surface that creates the gunwhale line between it and the top horizontal surface.


A view of the bow showing the difference in material from the reference surfaces on the left and the untouched layers on the right...


A couple of details shots showing the area on top of the canopy. The curved section (in front of the scale figure) will become the bridge, which will connect directly to the helicopter landing pad, where the figure is standing. The material to the left of the centreline has been left in place to allow further development.


Friday, September 4, 2009

Blocking in Major Surfaces

Here I am starting to block in the major surfaces, starting from the waterline up.


A large section of clay has been removed from the front of the main hull to allow me to sweep the main surfaces better. I would not be able to correctly block the underlying surfaces in with a large chunk of clay in the way, so it was suggested to me to remove that area and reapply it later if required.


More Clay, More Deck

I have the clay layed up to approx 10-12mm overall by now. I have re-attached the canopy and clayed it also. After fitting ther canopy back on I felt that the upper deck wasnt quite lon enough. It looked a little odd to have such a big canopy and really long lower deck, so I extended the upper deck to help balance it out.

This photo shows a scale human figure (1:100 to match the yacht). By placing it on the model it helps me to visualise features in a more accurate scale.


This shot better shows the extra length I have added to the upper deck and the proportions of the model in relation to the scale figure.