Thursday, August 27, 2009

Adding more clay...

At this stage I have applied about 3-4 layers of clay. Its about 4-8mm thick on the sides and top surfaces. Because I am using screws to hold the canopy on, I was able to take it off to apply the clay to the surfaces beneath (where the t-section of timber is visible). I will then re-attach the canopy and clay the top surface of that.

Using the heat gun to warm the clay surface prior to aplying extra layers of hot clay helps the layers bond to each other and (hopefully) not peel away when I comes time to shape it.


Monday, August 24, 2009

Trying out some surface options

I've added a bit of form to the side of the primary hull. I like the look of it, not sure if I'll transfer it to the clay model...


Yacht Canopy

So now I have added the frame work for the canopy. I have made it detachable so I can clay the decks underneath, then re-attach and clay the canopy. I still need to add the fins to the port and starboard to make it a trimaran.


Thursday, August 20, 2009

First layers of clay...

Here is the foam core model with the first couple of layers of clay applied. I still want to make a few changes to the area forward of the bridge, so I have only applied the first layers of clay to the sides. I'll remove som foam to create the forward deck and sunke skylight then continue claying up.
The armature seems to be pretty strong and doesn't move when Im pressing the clay into the foam, so Im real happy with that.

More to follow...


Wednesday, August 19, 2009

New Front Deck

The area in front of the bridge was looking a bit plain so I will add a deck out the front. Access is from either port or starboard running boards or directly from the bridge, door to follow.

I have also added a bit of surface detail to the forward skylight.


Tuesday, August 18, 2009

I'm the King of the World!!

or..

"this isn't where I parked my Star Destroyer"

Armature Build

Now that I have chosen a concept to develop and laid out the package for it, I can start the physical build. Now the fun stuff begins!

Here's a few shots of putting the model armature together.

Setting up the right size for the main base board. I had a plan view of the yacht o the paper, and this is the point where I decided I needed to rescale the project. Similar overall dimensions but at a more dramatic scale.

Marking out and trimming the model base board.


The plan view of the yacht, trimaran arms included. These were later removed as they would not sit on the waterline.

Prelim shaping of the foam to fit the model base board.


Gluing the model base board (on top) to the foam. Will then be flipped over when positioned on the armature.

Scribing a 10mm grid over the armature base. I made the centreline a bit heavier so it would be easier to see as I'm modelling.

Shaping out a few more contours of the primary hull. The armature board has been sealed with two coats of shellac.

Working on the model stands. They are pinned with dowels on the top and bottom and fit into corresponding holes on the base of the model and top of the armature base.

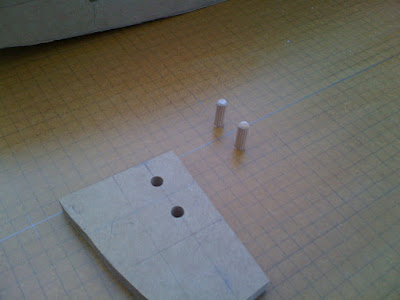
Close up of the pins on the armature base. I lined up their centres (x-axis) with the grid. I dont think it is crucial at this stage, but thought it was a good idea to keep everything referenced to the grid. Small piece of mdf is a template I made to help dril the pin holes on all the surfaces.

Detail showing the blocks with pins attached, and the holes in the base of the model board. Plants are looking a bit tired.

Blocks finished. This shows the base of the model (the waterline) sitting at 120mm from the armature base (Build Mode!). This should give me plenty of room to move when it comes to shaping the clay.

The waterline of the model sitting flush with the armature board (Presentation Mode!). By lining up the pins on the model, blocks and armature, the model will always be zero'd to the correct position.


All I need to do now is secure the 3 parts with angle brackets, so that when I start shaping the model won't move around.


Monday, August 17, 2009

ReScale


So after laying the scale dimensions out on the floor I decided it wasnt big enough. When people see this thing berthed at Kingston, they need to know instanly that it's Sir Richard's, so I have reworked the size of it. It will be approx 68m long overall, standing 9m high from the waterline with a beam of about 25m. That should do it.

Scale model size wil be at 1:100, so a pretty straight conversion to 680mm long x 90mm high x 250mm wide.


Wednesday, August 12, 2009

Package Layout

Final Concept Direction....


The final concept includes a large covered atrium/deck off the back, a central high-positioned bridge and extra glass ove rhte front surfaces to allow light below the deck. Entertainment space extends out across trimaran arms.


Wednesday, August 5, 2009

3 Concepts

Concept 3
Concept 2
Concept 1 - Open rear deck

3D base

Sometimes if Im having trouble getting the perspective right (particualrley with this project as there are a lot of long sweeps and curves), I create a quick buck in Alias to use as an underlay for my next lot of sketches...


Placing a human figure at the correct scale in the model also helps in getting the proportions and size right.

A lil' bit o' colour...


More Sketching...


Sunday, August 2, 2009

Space themeboards

Some of the images that are helping drive my development...

Various images from www.images.google.com

image from www.startrek.com


Closer...


Looking a bit 'spacier'.


More sketching, pushing it a bit more conceptual...


Testing different shapes and forms. Will go with a Trimaran (3 hulls) design because it allows me a bit more creative freedom both in development and should make a good looking physical model.


Initial sketches

These are a few of my initial sketches. Standard yacht shapes, a bit boring. Gotta Trek it up a bit.