Sunday, November 22, 2009

Final Presentation


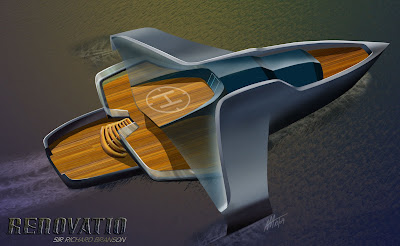
Renovatio is 64m (210ft) trimaran designed and commissioned for Sir Richard Branson.

Specifications:
LOA: 64m (210')
Beam: 11.5m (38')
Draft: Max 3.0m (10')
Speed: 25 knots / 28 Knots
Propulsion: Twin Magnetohydrodynamic drives
Year: Mfg-2011 Model-2011
Mfg: DLM Shipyard
Location: Australia
Type: Mega Yacht

Price: $AUD 94,000,000

Renovatio, the flagship of Sir Richard Bransons private vehicle fleet, is a 64m triple-hulled floating palace. With luxury fittings extending from stem to stern, Renovatio is capable of accommodating up to 36 passengers in 18 staterooms. The ships world-class compliment of 21 staff tends to every need and desire while the highly specialised 8-man engineering team maintains one of only 2 privately owned magnetohydrodynamic propulsion systems. The MHD drive allows Sir Richard to travel swiftly to and from his private Caribbean getaway, Necker Island, while the state-of-the-art communications systems allows him to command his vast empire from anywhere on the seven seas.


Finishing..... Finished!


After finishing all the spray-on painting all that was left to do was to paint in the timber decks by hand. This was done with brush-on acrylics, with several coats of different brown/tan colours to get the right finish. The final timber colours were applied very lightly with a dry brush to try and simulate the grain of the timber.

If I had the cash I would have liked to have the forward and rear decks, and also the helicopter pad, rapid prototyped to match the 2nd level deck. It came out really nice and is one of my favourite pieces of the build.

Tuesday, November 17, 2009

Finishing - Glass House/DLO


On the home stretch now...

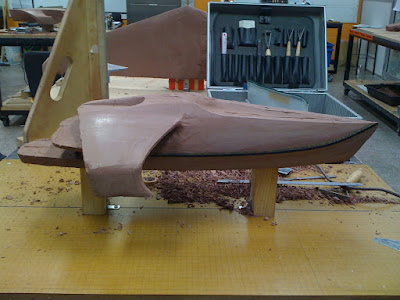
Here I am masking off the base coats in prep for painting the glasshouse black. This will really help show how much of the top surfaces of the super yacht are covered in glass.

Finishing - Base Colour

Checking the fit of the rear deck after the first top coat. The Deck railing is made from black acrylic, heated and bent to fit the deck edge. All the glass on the yacht will be presented as black, so the deck railing was made in black acrylic to show that its a glass railing.


After another 3 coats of grey primer were applied (with rubbing back between each coat) before the base colour was applied. I have chosen to go with a metallic gunmetal grey for the main surfaces. I didnt want to have 'just another white yacht' so I thought this would be a bit different.

These photos show the yacht with 3-4 coats of the base gunmetal grey applied. I rubbed back each layer of paint with 1200 wet & dry paper too. The colour seemed a bit bland with the first couple of coats, but each subsequent layer added extra depth to the paint.

Finishing - Primer


Several coats of spray on primer putty have been applied over the shellac sealer. Each layer was rubbed back with fine wet & dry abrasive paper before the next was applied.

There are about 3 layers of yellow primer putty on the model at this stage, plus the first coat of grey primer.
The grey primer coat has been rubbed back with 1200 wet&dry paper.


Prep for Painting

Before Shellac

After Shellac


With the surfaces nice and smooth I have started the finishing process. In theses pictures I have sealed the clay with a couple of light coats of shellac. This will (hopefully) allow the subsequent layers of primer and paint to stick to the clay surface.

Final Surfaces


Here I have finalised the surfaces and slicked them to a smooth clean finish. Using some foam-backed abrasive pads I lightly sanded the clay surface. This helped to highlight any small imperfections still remaining.

This was also the final fit check of the rear deck and staircase set before painting. It wasnt sitting square to the yacht so I removed a little clay until it fitted in snug.


Friday, October 23, 2009

Foil Check.... Check


Here I have applied foil to the surfaces to check the curvature and finish of the hull and canopy. The foil is quite reflective and has highlighted a lot of bumps, nicks and scratches on what I thought was a reasonably good finish. Good thing I tried it!

I was thinking that I would use this same foil to present the model, but its actually a bit tricky to get it on the surface, and it does do too well on compound curves. Best suited for larger spans of surface. So now I will prep the surface for a painted finish.


Cleaning Up the Surfaces


With just about all the major surfacing done, I'm now at the stage of trimming surface intersections and smoothing out. Also thinking how I want to finish it for the presentation.


Fitting the RP deck


With some excess clay trimmed the rear deck fits in snug. Its not shown in these photos but i have trimmed the armature so that the stairs will fit in properly. I just need to build the clay up a little on the lower deck to meet the steps and its done.


Thursday, October 8, 2009

Presentation Renders

Final presentation renders. Hope Sir Richard signs off on it!
Front 3/4 to follow....

Wednesday, October 7, 2009

Rapid Prototyped parts are back!


A couple of pics to show the rear deck and stairs I had RP'typed for the yacht. Back fresh from the printer so still need to clean the layer of gunk off 'em.

Its so cool that you can takes measurements for the part, model it and have it ready to be picked up within 6hrs start to finish. Makes me smile every time!

Tuesday, October 6, 2009

Rapid Prototype Part


As part of the final model deliverables we have been asked to produce a component of the model via 3D modelling, which is to be rapid prototyped. This is a quick render of the rear deck/stair assembly that I will have objet printed then dropped into place on the model.

Saturday, September 26, 2009

Surface Refinement

A few shots showing the new surface treatment. The upper surface of the side has remained the same, while the lower portion to the waterline has been given a subtle convex cross section. It has given the yacht a more aggressive stance and helped define the extended bow point.


Wednesday, September 23, 2009

Sketch-Overs


Scanner feeling better... somewhat.

Set one above, with more to follow...


Sketch-Over session = Updated Design Direction

After doing several pages of sketches over photos of the clay thus far, it was decided that I will change the surface forms. This includes changes to the hull lines and and extending the uppermost section to envelope the cabin.


Its a little hard to see here because the clay blends into itself, but the top lines extending from the bow point pull upwards and continue over and past the bridge, surrounding it in both sides. I will extend these lines past the bridge then possibly run them out/blend them in to the canopy surface.

Thursday, September 10, 2009

Matching Surface Symmetry

These pictures show how I have removed clay down to the points (depth) marked previously. I found that doing it this way (by not removing all the clay at once) would allow me to confirm that the points I had teken were correct and that I was not removing material that shouldn't be.


Trimming down to the Points


This technique seems to have worked for me as the symmetry across the centreline matches...